PDXplorer PDX Viewer Software
Open PDX packages created by PDXpert® and other product lifecycle management software
How to use PDXplorer™ PDX viewer
A PDX package is a manufactured item's point-in-time snapshot of its parts, documents, BOMs, approved sources, file attachments and other data. It's exported from a PLM (product lifecycle management) system for use by other computer systems, particularly MRP (manufacturing resource planning) / MES (manufacturing execution system) software. PDXplorer lets you view the items in this snapshot. You can search for items; view parts lists, BOMs, and sources; run queries in a local database, and extract text-based lists and the design file attachments.
Current PDXplorer download and install
PDXplorer Help Topics
PDXplorer PDX Viewer 4.2 on-line help
PDXplorer reader/viewer operation§
PDXplorer can open, show and extract product data from an industry-standard IPC-2570 file, called a PDX (product data exchange) package.
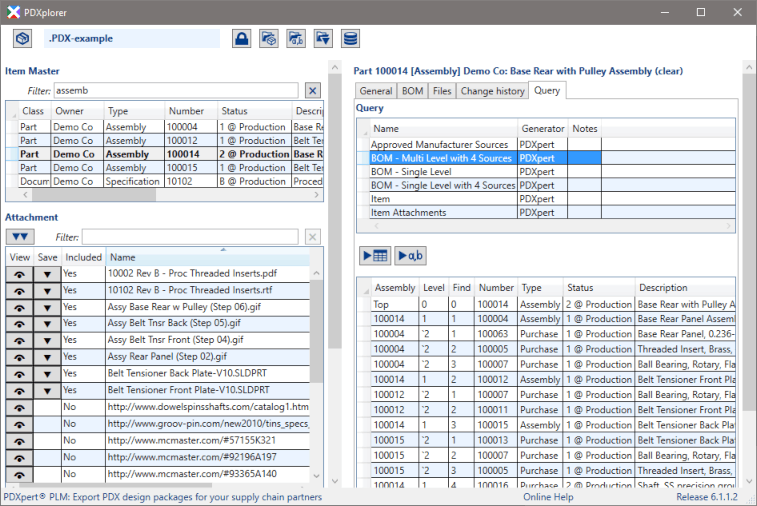
The application window displays four main areas:
-
At the top of the window, there are package file and folders controls.
-
The left-hand summary panel shows the PDX package content.
-
The right-hand details panel contains the PDX attributes for the currently-selected summary item.
-
The bottom of the window has resource links.
PDX packages contain IPC-2570 elements such as Items, ManufacturerParts, Changes, and Attachments. Similar elements are grouped in tables. In most cases, each table shows the IPC-2570 element's attributes as columns. Attributes are sometimes displayed in panels of name:value pairs such as Unit of measure: EACH.
Package file and folders controls§

 Open PDX package file§
-
Opens a window that lets you select a PDX package to open. For more information, including opening a password-protected PDX package, see Opening a PDX file.
- Package name
- This is the name of the PDX package that is shown. Click on the package name to show the package information, and all package-level queries, in the details panel.§
-
 Export a copy with password§
 -
When the open PDX package does not have a password, click this button to create a password-protected copy of the open file. The suggested file name can be changed or replaced. The open file is not changed, closed or replaced.
This button is shown only for verified PDX packages signed by PDXpert 15.0 (or later), using a SHA-256 signed license key. PDXpert 15.0 is planned for release in late 2021. Contact us if you wish to preview this release.
See PDXpert/PDXplorer IPC-2570 extensions for technical information about password-protected PDX packages.
-
 Open PDX package folder§
 -
Opens the folder that contains the current PDX package file. If no package has been opened, the default Documents folder opens. This folder is saved when you close PDXplorer, and available when you re-open the application.
-
 Open saved query results folder§
 -
Opens the folder that contains the most recent query results saved as comma-separated values ("CSV"). If no query result files have been saved, the default Documents folder opens. This folder is saved when you close PDXplorer, and available when you re-open the application.
-
 Open saved file attachments folder§
 -
Opens the folder that contains file attachments that were saved from the PDX package. If no file attachments have been saved, the default Documents folder opens. This folder is saved when you close PDXplorer, and available when you re-open the application.
-
 Open package working folder§
 -
Opens the temporary folder where the PDX package file has been converted into a SQLite database file. PDXplorer exports SQL query results from this temporary database.
Each temporary SQLite database file is named PDXplorer{Id}-{original package name}-{local date/time}.sqlite. The {Id} value is normally not needed unless the same package was opened at the same time in another PDXplorer instance.
The temporary database for every PDX package that you open in the current session is not deleted when PDXplorer is closed. The next time PDXplorer is started, and if no other PDXplorer instance is open, then all previous temporary database files are deleted.
To keep a temporary database file for your own purpose:
- While PDXplorer is open, click on
Package working folder button to see the folder contents.
- Close all PDXplorer instances, including the current instance.
- Copy or move the file from the package working folder to another location.
In Windows File Explorer, this folder is %LocalAppData%\PDXplorerDB\Working\
PDXplorer 5.2 and later also temporarily saves the package's pdx.xml metadata in this folder. It uses the same file name with an .xml extension, and follows the same delete behavior.
- While PDXplorer is open, click on
Summary panel§
The summary panel shows the main elements of the PDX package. The columns show basic identification data, such as part number, change description or contact name. When you click on a summary table row, more data about the selected row is shown in the details panel on the right.
You can find a specific part, attachment or other row by entering text into the Filter: box at the top of each table.
Very few PDX packages include all possible elements defined in the IPC-2570 standards. Elements may not include some IPC defined attributes, or may add new attributes as extensions.
Tables shown in the summary panel§
Most PDX packages do not include the full set of elements defined by the IPC-2570 standards. An element's summary table is displayed only when the PDX package contains the related element.
In a package created by PDXpert PLM software (9.1 and later), the tables are
- The Item Master combines the IPC-2570 elements Items, Manufacturer Parts, and Changes in a single list
- Attachments for all elements
- Contacts
Top Level Items Tree Shows each item (part) that has its isTopLevel='Yes'. Top-level items are normally parts with bills of materials, and these are included in a multi-level BOM tree. A PDX file without any top-level items won't show this tree.

In packages created by all other PDX generators, the summary panel tables may be
- AsBuildProducts
- Items (parts and documents)
- Manufacturer Parts
- Supplier Parts
- Changes
- Contacts
-
Attachments for all elements
Top Level Items Tree Shows each item (part) that has its isTopLevel='Yes'.
In PDX packages with change markups, the Attachments table may include both released files as well as canceled or obsolete files. See Viewing and saving file attachments: Save all files.
Details panel§
This shows more information about a row you've selected in the left side summary panel. The summary row for a Contact will show different information than a row selected from the Attachment table.
See PDX packages created by PDXpert software for other detail tabs.
- General
-
Contains the element's attributes. In PDXpert packages, this tab includes other additional attributes tied directly to the element that aren't shown in their own tab (such as Custom, Materials, References).
- Attributes
-
Contain the AdditionalAttributes not placed elsewhere.
- BOM
-
Lists bill of material rows for the selected Item assembly. Immediately below this list is the assembly's multilevel Bill of Material tree.Rel 5.1
- AML
-
Contains the approved manufacturers list.
- Files
-
Contains file attachments.
- Change history
-
Shows the item's revision history.
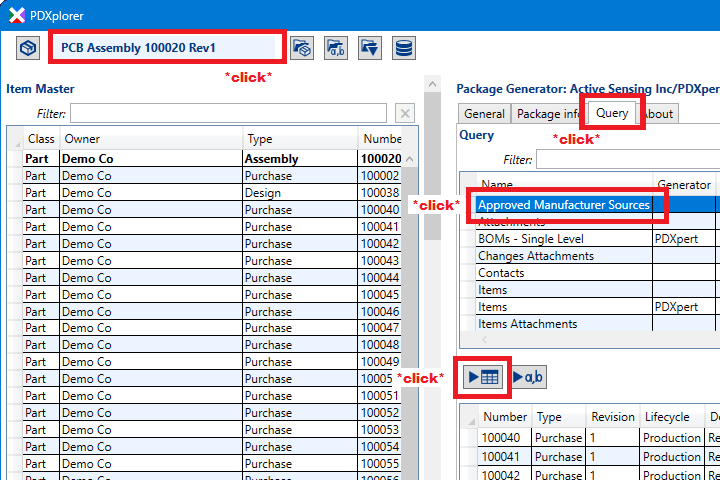
- Query
-
Contains queries for viewing and exporting data related to the selected element.
- The package element's Query tab contains all queries related to the entire package contents.
- A selected element's Query tab contains queries that are related to that one selected element.
The package element Query tab makes simple data lists to import into a manufacturing system:
-
All Items (each part and document with number, type, description, units, etc.); Manufacturer Parts (purchased part details); Contacts (usually manufacturers and suppliers, and also the contact who created the PDX package).
-
Parent-child relationships: Approved Manufacturer Sources (that is, purchased parts and their sources); single-level BOMs (assembly-component part lists); Attachments (list of files attached to items).
There are special versions of these queries, the PDXpert PLM queries, that combine basic package information with additional attributes. Although they're optimized for use with PDXpert's Batch Importer tool, other importers may be compatible.
The exported CSV files can be edited before importing. To exactly match your manufacturing system's import format, see Adding new queries.
Resource links§

The PDXpert® PLM: website link includes technical information about PDXpert software, and how it creates a PDX package. The on-line PDXpert user guide describes the package content. PDXplorer exports data to complement PDXpert's data import tool, making it easy to use PDX packages as the foundation of a new PDXpert system.
PDXplorer Online Help opens this help page in your browser.
PDXpert application Release 6.X.X.X opens PDXplorer's current download page, which may have an upgrade for your release.
Using PDXplorer§
Opening a PDX file§
Opening a standard PDX file§
Click the
Open PDX package file button to select a PDX package file.
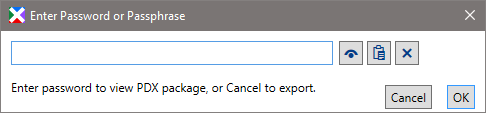
Opening a password-protected PDX file§
If you select a password-protected PDX package, then the Enter Password or Passphrase window is automatically shown.
 Show password button shows the password only while you press the mouse button.
 Paste from clipboard button copies a password from the Windows clipboard to the password box.
 Clear password button removes all text in the password box.
The password is kept after it's entered. This lets you open a set of PDX files, or several attachments within a PDX package, using the same password. A new password replaces the previous one. The password is not saved when PDXplorer is closed.
- To view the content of the encrypted file: Enter the assigned password/passphrase, and then click the button.
-
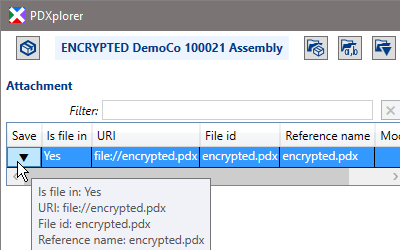
To export the current password-protected file as a new PDX package without a password: Click the button.
This opens the "outer" PDX container that includes information about the "inner" encrypted PDX package.
-
The inner encrypted.pdx is shown in the Attachment table. Select the row, and click the
 Save selected file button.
 -
Name the file and locate the folder, then click the button. The suggested file name can be changed or replaced.
The starting folder is where you last saved a file attachment (which may not be the encrypted PDX file's folder).
-
Enter the assigned password/passphrase, and then click the button.
-
Filtering table rows§
Most tables have a Filter: textbox. To find rows with matching text, enter one or more search terms, with each term separated by a space.
-
The filter is enabled only when the table has more than one row.
-
All of the table rows are shown when the filter is empty.
-
Only element rows that contain the filter are shown.
-
Remove the current filter by clicking the
 button
at the end of the filter textbox.
button
at the end of the filter textbox.This button is not enabled when the filter is empty.
-
When you change or remove the filter, selected rows in the related table are unselected. When the details panel is showing details of a row in the related summary table, it's also cleared. The details panel is not cleared when it's showing row details for an unrelated summary table.
-
Searches are case-insensitive. For example, filter term Part matches PART, Part and part.
-
Partial matches are displayed automatically, without using a wildcard character. For example, filter term art matches rows with art, PARTS, and Artwork.
-
Using more than one filter term shows only rows that have both terms. Separate each filter term by a keyboard space. For example, filter terms ECN 1001 match element rows that contain both ECN and 1001.
Most PDX package elements do not include the full set of attributes defined by the IPC-2570 standards. Along with the element's non-empty standard attributes, PDXplorer searches most elements' AdditionalAttributes.
-
Attributes that are Yes values are searched using the attribute's name. For example, when the file's isFileIn is Yes, the filter term isfilein is added to the file attachment's index. The isfilein term is not added when the attachment's isFileIn is No. The standard PDX file Boolean (Yes/No) values are:
-
isAlternate: GroupRole
-
isCertificationRequired: Item
-
isFileIn: Attachment
-
isSerializationRequired: BillOfMaterialItem, Item
-
isTopLevel: AsBuiltProduct, Contact, Item, ManufacturerPart, SupplierPart
-
-
When a PDX package is generated by PDXpert PLM software, "helper" tags are added to the element's index:
-
Home items — parts, documents and changes — have a home tag.
-
Manufacturer parts have a partner tag.
-
Change elements have a change tag.
-
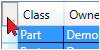
The class tag is c:, with values of Part c:prt, Document c:doc, and Change c:chg.
-
The full index for each row can be seen in the package's SQLite database, in the table's Tokens column.
Sorting & moving table columns§
To sort the data rows, click on the column header to sort smallest value to largest. Click again to sort in reverse order.
It's sometimes useful to arrange columns before copying the data. You can drag a column's header label to a new location. The column will return to its original position when the table is next loaded.
Copying data§
To view and copy data into other applications, such as email or Excel:
- Click on the table row selector
 or grid selector
- Press the Ctrl + C keys on your keyboard.
In PDXpert 5.2 and later, the table column headers are copied with the data rows.
Viewing and saving file attachments§
PDX package file attachments come in three forms: included, linked and named.
Included file attachment§
This file is included in the package, and can be viewed or saved. To conserve disk space, files remain compressed when the PDX package is opened. An included file is exported from the PDX package only when it's viewed or saved.
-
 View selected file
§
View selected file
§
-
PDXplorer saves the file into a temporary location and sends an Open file request to Windows. If Windows can find a related software application, the file will be shown.
On the summary panel's Attachments table, you can also double-click the row to view the file.
-
Save selected file
§
-
Select a file location and, if you wish, change the file name.
-
 Save all files
§
Save all files
§
-
Select (or make) a folder for all files included in the PDX package.
A conflict number, like PartData-Conflict(1).pdf, is added to the file's name when:
- A file with the same name already exists in the selected folder; or
- There are two or more files in the PDX package that share the same name.
It's possible that a PDX package can have more than one file with the same name and with different content. For example, a file named PartData.pdf can be attached to a screw, while a different file PartData.pdf could be attached to a resistor. If you're not sure whether files are the same or different, view the files' content and, if needed, save them separately under new names.
A change notice PDX package may show "markup" attachments that have been added or removed by the change.
- A file attached to a new revision is shown as bold green text with a green border.
- A file attached to an old revision is shown as normal red text with a red border.
You normally won't need markup files, so the
Save all files includes only files attached to non-markup rows.
If you want to save a markup attachment, you must use the row's
Save selected file
button. Be careful when saving a markup file: it may be named the same as a non-markup file, and
may have the same or different content.
All files that are attached to the change are shown as normal files, and are included in the
Save all files folder.
Linked web resource attachment§
-
View selected web resource
§
-
When the link is properly formatted (specifically, it begins with http:// or https:// ) then this button is shown. Click the button to open your browser to the resource, such as a supplier website.
Named file attachment§
This file is identified but is not included, and is not available as a linked web resource. If the file details suggest that this file may be useful to your work, ask the PDX package supplier about the file.
Viewing and saving data query results§
Select a summary item to show the item details and query results:
-
In the Summary panel, select a row in a table.
-
In the Details panel, select the Query tab.
-
In the Query table, select a query row.
-
Click the
 button
to show the query results, or
button
to show the query results, or  to save the results to a file.
Using queries§
A query contains SQLite database commands that display useful results. These results can be saved to a text file for other software tools.
-
Click on the PDX package name to see the package queries in the Queries tab on the details panel. A package query exports all data of a specific type, such as all Items, ManufacturerParts, Changes Affected Items, Assemblies Components, Contacts. (By convention, these are named as plurals.) These are classified in the PDXplorerQueries.sqlite database as ProductDataeXchangePackage in the Element column.
-
Selected item queries are written for a data element that you select in a summary table. These queries might include all BOM rows for a selected assembly, or all affected items on a selected change. The selected item is added to the SQL query using WHERE element name_Id = {0}, such as WHERE Item_Id={0}. PDXplorer automatically substitutes the selected element's Id value for {0}. By convention, these queries use a singular name as the anchor, optionally followed by relations: Assembly Components, Change Affected Items, Part Sources.
PDX packages follow the framework defined by the IPC-2570 standards. However, these standards are flexible — a software tool exports PDX packages according to its own needs, data and customers. Thus, PDXplorer offers queries that support different PDX package generators:
-
General queries are useful for most PDX packages. These have an empty cell in the Generator column. The query may apply generic "best guess" column headers or use the IPC standard attribute names, and may include empty columns that the generator software didn't need.
-
Queries can be designed for PDX packages that are generated by specific software applications. The Generator column matches any portion of the package's XML <?generated_by ... ?> text, and the query applies specific rules to the PDX package. For example, when the SQL query's Generator column contains PDXpert, the query shows only when you open a PDX package generated by PDXpert software.
If there's a choice of queries (for example, a Items Attachments without a generator and an Items Attachments for a specific generator), then the query written for the specific generator normally gives better results.
Adding new queries§
Queries are contained in a SQLite database called PDXplorerQueries.sqlite. You can add queries to match PDX package data to your ERP/MRP import format or other use.
-
The query database is created in the %LocalAppData%\PDXplorerDB\QueryDB\ folder when you open your first PDX package.
In Windows File Explorer, this file path is similar to C:\Users\{username}\AppData\Local\PDXplorerDB\QueryDB.
-
Copy the standard PDXplorerQueries.sqlite, add your own queries, and then replace the standard PDXplorerQueries.sqlite file with your version.§
To add your own query, write the SQLite code and then add a new record to the Query table:
-
Name Required: Use a unique name for the new SQL code.
-
Generator: Leave blank if the query works with a generic IPC-2570 package. If written for a specific generator, enter any portion of the package <?generated_by ... ?> directive. Your code can target packages generated by a specific company (HX3 Solutions), product (PDXpert), or even release (PDXpert/14.0).
-
Element Required: The detail panel where you want to show the query. For example, if your query selects data from the Item table (e.g., SELECT * FROM Item WHERE Item_Id={0}), you can display the query in the Item detail panel's Query list by setting the Element value as Item.
-
Notes: Any information (purpose, constraints, author, etc.) about the query and its use.
-
SQL Required: This is the SQLite code that you've written.
-
LastEdited: ISO-8601 style date/time value. You can run the Admin table's Update LastEdited query.
-
Options Required: Always set this value to Compare=No;Output=Export;
-
Tokens: These text tokens are used to filter the list of queries. Use the Name and Generator text, or run the Admin table's Update Tokens query.
To replace the standard PDXplorerQueries.sqlite with your version:
-
Open PDXplorer (just one copy should be open).
-
Click on the
Package working folder button to open the folder in Windows File Explorer. -
Close PDXplorer.
-
In Windows File Explorer, move to the QueryDB folder (%LocalAppData%\PDXplorerDB\QueryDB\).

-
Delete the current PDXplorerQueries.sqlite file.
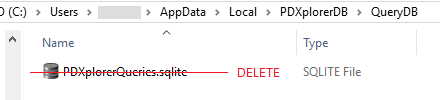
-
Copy the replacement PDXplorerQueries.sqlite into the QueryDB folder.
-
Open PDXplorer to confirm that your new queries show the expected results.
-
-
You can copy your version of PDXplorerQueries.sqlite and share it with other people.
-
To return to using the standard set of queries, delete the %LocalAppData%\PDXplorerDB\QueryDB\PDXplorerQueries.sqlite file. When you open the next PDX package, PDXplorer adds the standard database to the empty folder.
Restoring your custom queries after an upgrade§
Upgrading PDXplorer may replace the current database with a newer version. After upgrading, the replaced (old) database is in the %LocalAppData%\PDXplorerDB\QueryDB\ folder, and its filename includes the upgrade date (e.g., 20210928T151055). You can copy your queries from this file into the new PDXplorerQueries.sqlite database file. After restoring your custom queries, test them with the new release.
Results§
The buttons shown after the list of queries let you see the results.
- Run query
-
Displays the query result as a table. You can copy selected rows, or the complete table, to the Windows clipboard.
- Run query and save results to file
-
Runs the query and lets you save the result as a CSV (comma-separated values) file. The file format is UTF-8 with Windows CR+LF (ANSI 13 / 0x0D)+(ANSI 10 / 0x0A) line terminations. This file can be opened in text editors like Notepad++ and Windows Notepad, CSV editors (recommended!), and Microsoft Excel.
Excel is not a good choice if the CSV file contains text that Excel considers numbers and dates. For example, Excel may convert document number 00123 to 123, or part number 2021-01 to January 2021. Some versions of Excel can also have problems reading and saving Unicode characters.
Using the Windows Command Prompt§
PDXplorer can be run from the Windows Command Prompt.
"path\pdxplorerdb.exe" [ {/close | /c} ] [ {/password | /p} { password | "password" } ] ["path\package.pdx"]
Other than the password, all parameters are case-insensitive. [ value ] indicates an optional value; do not include the [ ] characters with the parameter. { A | B } indicates a choice between two values; select only one value, and do not include the { | } characters with the parameter. Double-quotes are required only if the value includes any space characters.
"path\pdxplorerdb.exe" is the full path and name of the PDXplorer application. Required.
/close or /c closes the PDXplorer application after it has processed the specified PDX file. Optional, used only when a package.pdx is also specified.
/password or /p uses the specified password to open the specified package. The password must immediately follow the /password or /p switch. If surrounded by double quotes, the password can include spaces or Windows reserved characters: "Qs: A9/g" (do not use a double-quote " character within the password). When used without other options (for example, in the PDXplorer icon's Target: property), it assigns a default password for the session. Optional.
"path\package.pdx" is the full path and name of the PDX package to open. Optional.
PDX packages created by PDXpert software§
PDXplorer knows a lot about PDX packages generated by PDXpert software. Packages exported from PDXpert (release 9.1 and later) can show the following additional information. Some of this information may also be included in PDX packages exported from other PDX generators, and can be exported using the included Queries or your own SQLite queries.
If PDXpert settings conflict with IPC-2570 constraints, then PDXplorer may show the file as a generic PDX package. For example, PDXpert can allow a partner part to have a BOM or sources, but the IPC-2578 standard for a partner part (IPC ManufacturerPart) does not. In this case, it's possible the Item Master table cannot be created, thus other PDXpert-related relationships can't be made. Standard IPC-defined relationships are used instead.
Package file controls§
-
Export a copy with password§
-
A PDX package created by PDXpert 15.0 or later can be exported as a password-protected file. The original file is not changed. The password can be used by the file's sender (in-transit protection) or receiver (on-site protection).
Summary panel§
- Item Master table§
-
The Item Master table combines Items, Manufacturer Parts, and Changes. This makes filtering easier, and is similar to how PDXpert software treats these items.
- Helper tags§
-
Items' owner category and class tags are automatically added to help filter the Item Master table. See list of tags.
Detail panel§
- Custom§
-
PDXpert software allows application administrators to create custom attributes. These are exported as AdditionalAttributes group PDXpert.Custom, and PDXplorer recreates them in the Custom tab.
- Materials §
-
Materials (chemical substances) are not defined in the IPC-2570 standards. PDXpert PLM software packages these as AdditionalAttributes group PDXpert.Materials, and PDXplorer recreates them in the Materials tab.
- References§
-
The IPC-2570 standards do not define a separate list for document references, tooling and other related items. PDXpert software exports its References list as AdditionalAttributes group PDXpert.References, and PDXplorer recreates them in the References tab.
- Contact for§
-
This shows the list of all items where the selected contact is the item's Owner (that is, the responsible organization).
- Appears on§
-
By knowing PDXpert's standard item definition, PDXplorer can create a consistent Item Master list. This simplifies linking parent-child pairs like Assembly–Component, Home part–Partner source, and Item–Reference. These paired relationships also offer the reverse capability: an item can identify where it appears on a higher-level assembly, or as a source for a home part, or as a reference.
- Attached to§
-
A selected file attachment identifies the part, document or change form where it's attached.
- Markup§
-
This shows the change markup details for attachments, BOMs and sources on revised items.
While PDXplorer can read almost any PDX package, it works
best with packages generated by PDXpert PLM software. This is because
PDXpert's IPC-2570
implementation is published and it's easy to obtain PDXpert PDX package
examples. Other PDX package generators typically don't publish their specifications or example
files.
To improve PDXplorer's capabilities showing other PDX packages, contact us:
PDXplorer![]() HX3.com
HX3.com
Other information§
Top-level items§
The software that created the PDX file may have identified some elements as being "top level" objects. These are shown in the table as bold, and are shown in the Top Level Items Tree with their multi-level BOM (if any), but otherwise don't affect PDXplorer's operation.
Package info§
PDXplorer converts the PDX package's internal pdx.xml file to a dataset for building the PDXplorer user interface. It then converts the dataset to a SQLite database for running queries and exporting results. Summary information is shown in the PDX package's Package info tab.
Error log file§
Different generators structure PDX data differently. In some cases, the generator may not exactly follow the IPC-2570 standard, or the PDX package XML metadata has become damaged, or there is an error in file decompression or decryption. PDXplorer records basic file activities, errors, and other information in a log file.
A log entry is shown as [date] [type] [release:schema] [elapsed time] [generator].
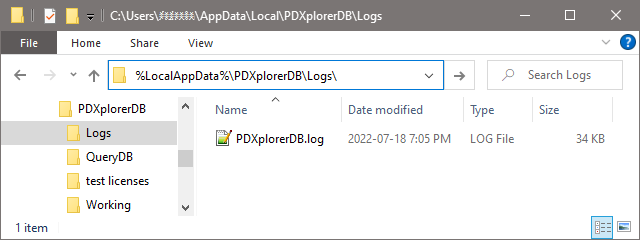
The file is saved in the %LocalAppData%\PDXplorerDB\Logs\ folder.
In Windows File Explorer, this file path is similar to C:\Users\{username}\AppData\Local\PDXplorerDB\Logs.
Or, use these steps to find the log file:
-
Click on
Package working folder button. -
In the Windows File Explorer address bar, select the PDXplorerDB\Logs folder.

-
Copy the PDXplorerDB.log file.
Software license files§
PDXplorer software is offered under license. Read the PDXplorer software license.
Open-source components are used for selected PDXplorer functions.
Software license files are in the %ProgramFiles%\PDXplorerDB\Licenses folder after installation.
<setting name="CommonTLD" ...>§
When an attachment isFileIn=No, then PDXplorer uses the CommonTLD setting in the %ProgramFiles\PDXplorerDB\PDXplorerDB.exe.config file to decide whether an attachment is a partial web address or a normal file extension. If the attachment uses a top-level domain ("TLD") that's in the list – for example, .com, .aero, .ch –, then the attachment is treated as a clickable link. Other values, like .pdf and .dwg, are treated as file type/MIME extensions to attachments that aren't in the package and can't be opened. The list is formatted as a comma-separated list of TLDs that include the leading separator (.) character.
PDXplorer 4.2 and earlier§
PDXplorer PDX Viewer 4.2 on-line help
The most recent PDXplorer offers an improved view of PDX package content and better Windows compatibility. However, PDXplorer 4.2 may still be useful in some circumstances.
- PDXplorer 4.x works with older Windows, including Windows XP and Server 2003. It requires only .NET 4.0 Client, while the current PDXplorer requires a recent .NET release.
- The older application presents a raw view of the IPC-2570 XML. The data isn't reformatted, filtered or exported to be more "human-friendly". This literal view may be more useful for packages generated by applications other than PDXpert PLM software, or where you need to see every technical detail.
- You can use previous 4.x customizations such as file exports, language translations and application-specific nomenclatures.
PDX file info & solutions§
Disassembling PDX files§
The PDX package format is defined by the IPC-2570 series of industry standards. The package is a compressed file that contains a pdx.xml file and usually design file attachments. All files are compressed into the PDX package using standard compression; in other words, we're working with a simple .zip file with a .pdx extension.
To look inside:
-
Save a new copy of the original PDX file to a convenient location, such as your computer Desktop or My Documents folder.
-
Open Windows Explorer, and change the copy's file extension to .zip, in our case from PDX-example.pdx to PDX-example.zip. We will be extracting files from this archive.
-
Open the PDX-example.zip archive file with Windows Explorer or a third-party tool such as WinZip.
Within the PDX-example.zip archive file, find the pdx.xml file and copy it to a location on your computer, such as your Desktop. This contains all the part, BOM, AML, and other design metadata. If you wish, you can also extract the file attachments from the archive file.
Adobe Reader PDX file icon§
Adobe Reader's secondary Catalog Index files use the same .pdx file extension as PDXplorer, although the files have different purposes. All PDX files will be associated with whichever application was last updated. Since most users never open Adobe Catalog Index files, it's usually more convenient for Windows Explorer to display PDXplorer's "package" icon, and to launch PDXplorer on double-clicking.
After an Adobe Reader update, you can refresh the PDXplorer package icon using Windows Control Panel: open Programs and Features, scroll down and select PDXplorer, and then click the or button. This won't affect the Adobe Reader .pdf file icon, or normal Adobe functions.