PDXplorer PDX Viewer Software
Open PDX packages created by PDXpert® and other product lifecycle management software
How to use PDXplorer™ PDX Viewer Release 3
PDXplorer Release 3 is obsolete and has been replaced. View the user guide for PDXplorer Release 5.
- Download and installation
- PDXplorer Viewer 3 operation
- PDXplorer Viewer 3 customization
- Adobe Reader PDX file icon
PDXplorer Viewer 3 operation
PDXplorer Viewer release 3 can view and extract product data from IPC-2570 files.

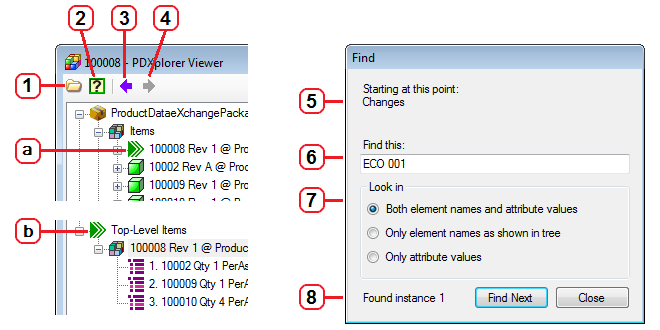
- Click to open a PDX file.
- Click to open this on-line help page in your default browser.
- Go back to the previous element on the navigation tree.
- Go forward to the next element on the navigation tree.

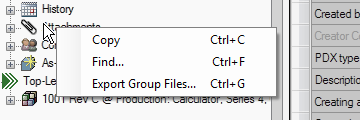
Most locations have a right-click context menu that allows you to copy text (Ctrl+C) and — where appropriate — export one file (Ctrl+E) or the selected node's group of files (Ctrl+G).
The Find window (context menu Find... or Ctrl+F) looks for text within the selected node.
- The search will be constrained to elements within the selected navigation tree node. To search the entire PDX file, select (click to highlight) the top ProductDataeXchangePackage node before opening the Find window.
- Enter the exact search text that you want to find; for example, ECO 001.
- You can specify whether searches are limited to the element names in the (left-hand) navigation tree, attribute values within the (right-hand) detail panels, or both.
- The number of matches will be incremented until no further matches are found. All matched elements are added to the navigation history list, and (after closing this window) you can move backwards and forwards to re-visit the elements.
The software that created the PDX file may have identified some elements as being "top level" objects. The navigation tree has two parts: the upper subtree displays a detailed breakdown of each element in the package; the lower subtree (if it exists) displays each top-level item as a multi-level BOM.
- This icon indicates a top-level item, that is, a PDX Item element where its isTopLevel attribute is Yes.
- All top-level items are collected in the Top-Level Items group. Their indented bills of materials are reconstructed from their, and their child items', BillOfMaterial sub-elements.
To copy the contents of a grid, click in the upper left corner and then right-click to display the context menu.

Grid rows can be sorted by clicking some column headers, such as Number or Description.
Click on a hyperlink to view a file. The file is opened using your computer's default application for that file type. Any modification to the file will not be saved in the PDX package.
PDXplorer Viewer 3 customization
Always take a backup of the original XML file before making any changes to it.

PDXplorer Viewer relies on XML files to provide alternate languages and — since PDX generators have different implementations of the IPC-2570 standard — to optimize display of PDX data.
- AttributeDescriptor maps IPC-2570 attribute names to the grid detail labels.
- ElementDisplayName formats how elements are presented within the navigation tree.
- UITextLookup contains the application's user interface text. You can improve the provided translations or create other language translations by editing one of these files.
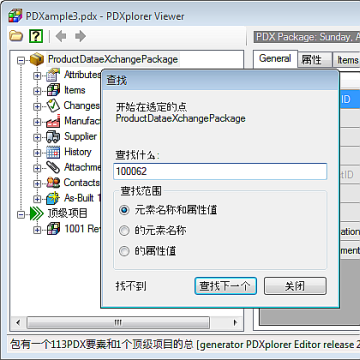
To match a specific PLM system's export labels or to substitute another language, edit the appropriate XML files. In addition to English, the PDXplorer Viewer setup file includes several language translations (Deutsch, 中文, Español, Française). To use one of these replacement files, follow the procedure below. You may need administrative permissions on your computer to perform these steps.
- Open Windows Explorer to the PDXplorer PDX Viewer application folder, and then the \XML\ sub-folder. This is typically C:\Program Files\PDXplorer Viewer\XML\ or C:\Program Files (x86)\PDXplorer Viewer\XML\
-
In this XML folder, open the Configuration.xml file using Notepad or similar plain text editor.
As an example: To change the user labels to German, find and edit the line:
from <File name="UITextLookup" value="UITextLookup-EN.xml"/> to <File name="UITextLookup" value="UITextLookup-DE.xml"/> -
Save the Configuration.xml file; this may require saving it to some other location, such as your Desktop, and then dragging it back into the XML folder.
-
You must restart PDXplorer PDX Viewer for changes to take effect. (Some versions of Windows appear to cache the XML, and you may need to restart your computer.)
We'd very much appreciate receiving your contributions for improving these configuration files.
Very large PDX files
It's possible that a PDX file generator has included so many large file attachments that PDXplorer cannot decompress the file with the available system resources. In this case, you can manually extract the product data (and file attachments), and then recreate a smaller PDX file.
-
Save the PDX file to a convenient location, such as your computer Desktop or My Documents folder. Let's say you're working with the example.pdx file, and you save it to your Desktop.
- Open Windows Explorer, and change the file extension to .zip, in our case from example.pdx to example.zip. We will be extracting files from this archive.
-
Open the example.zip archive file:
- If you're using a recent Windows system, such as Windows 7, open the file as a compressed folder with Windows Explorer.
- If you're using an older system, such as Windows XP, then use a third-party tool such as WinZip.
-
Within the example.zip archive file, find the pdx.xml file and copy it to a location on your computer, such as your Desktop. If you wish, you can also extract all of the file attachments from the archive file.
-
Create a new compressed archive file that contains only the pdx.xml file:
- If you're using a recent Windows system, within Windows Explorer, right-click on the pdx.xml file and select , for instance pdx-only.zip.
- If you're using an older system, such as Windows XP, then use a third-party tool to add the pdx.xml file to a new pdx-only.zip archive file.
- Change the new archive file's extension to .pdx (like pdx-only.pdx).
The new PDX package now should be small enough to open with PDXplorer. This allows you to examine the items, BOM and other data. However, it doesn't contain the file attachments of the original PDX file, so none of the attachment links will work.
Adobe Reader PDX file icon
Adobe Reader's secondary Catalog Index files use the same .pdx file extension as PDXplorer, although the files have different purposes. All PDX files will be associated with whichever application was last updated. Since most users never open Adobe Catalog Index files, it's usually more convenient for Windows Explorer to display PDXplorer's "package" icon.
After an Adobe Reader update, you can refresh the PDXplorer package icon using Windows Control Panel: open Programs and Features, scroll down and select PDXplorer Viewer, and then click the Change / Repair button. This won't affect the normal Adobe Reader .pdf file icon, or normal Adobe functions.