PDXplorer PDX Viewer Software
Open PDX packages created by PDXpert® and other product lifecycle management software
How to use PDXplorer™ PDX Viewer software
- Download and installation
-
PDXplorer PDX Viewer 4 operation (or see How to use PDXplorer PDX Viewer Release 3)
- Customizing PDXplorer PDX Viewer
- PDX file problems & solutions
PDXplorer 4.x PDX Viewer operation
PDXplorer release 4.0 can view and extract product data, as well as compare two or more PDX files and highlight the differences. PDXplorer release 4.1 adds the ability to export data into CSV files, while release 4.2 can compare top-level assemblies with different item numbers.
The application window displays two main areas:
-
The left-hand navigation panel contains the application toolbar and a multi-level "tree". The navigation tree has two main branches, the original ProductDataeXchangePackage, and a reconstructed indented BOM for each top-level item. Each node on the tree represents a PDX element.
When more than one PDX file is open, the elements from all open files are merged into a single navigation tree.
-
The right-hand details panel contains the PDX attributes of the currently-selected navigation tree node.
Top-level items
The software that created the PDX file may have identified some elements as being "top level" objects. The navigation tree has two parts: the upper sub-tree displays a detailed breakdown of each element in the package; the lower sub-tree (if it exists) recreates each top-level item as a multi-level BOM.
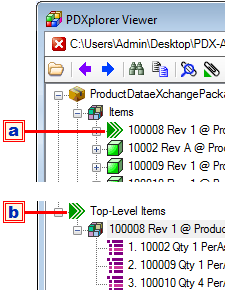
- This icon indicates a top-level item, that is, a PDX Item element where its isTopLevel attribute is Yes.
- All top-level items are collected in the Top-Level Items group. Their indented bills of materials are reconstructed from their, and their child items', BillOfMaterial sub-elements.
If you open more than one PDX file, top-level items are compared to each other and their differences are highlighted.
Control buttons
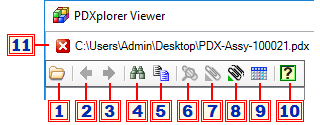
A toolbar button is disabled if the related action is not available.
-
Click to open a PDX file.
If you open more than one PDX file, these will be compared side-by-side, and differences are identified using a text style like 12345 Rev 02 @ Prototype (defined by ElementDifferentiator.xml).
- In release 4.0 / 4.1, top-level items are matched on their itemIdentifier, itemClassification and globalProductTypeCode elements. That is, top-level items are compared if they are the same or different revisions of the same item.
-
In release 4.2, if each PDX file contains exactly one top-level item (isTopLevel=Yes), then these top-level items are compared regardless of the item identification elements' values. This allows comparisons between similar but non-interchangeable assemblies.
The top-level item that's displayed in the navigation tree is taken from the PDX file that's first opened — click on that tree node to view the matched top-level items in the details panel.
PDX packages with more than one top-level item will cancel all comparisons.
To view several PDX files without comparing them, simply open another PDXplorer client from the Windows Start menu.
- Go back to the previously-visited element on the navigation tree.
- Go forward to the next previously-visited element on the navigation tree.
- Open the Find window to search for text.
- Click to copy the selected row or grid.
- View the selected file attachment. (Or, click the filename link in the details panel.)
- Export the selected file.
- Export the group of all files within the selected node.
-
Export a comma-separated value (CSV) file from the selected node, using the Save As window's Save as type: format.
- This command button is available only in PDXplorer release 4.1 or later. If you don't see this button, upgrade your PDXplorer.
- To use this button, see Export data as CSV file.
- To add or modify export formats, see Customizing export formats.
- Click to open this on-line help page in your default browser.
- Click to close the file next to the button. If you don't want to compare PDX files, close each file before opening another.
Text search
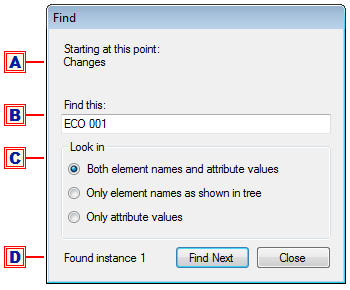
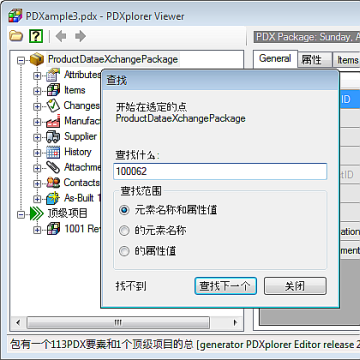
The Find window lets you search for text in PDX elements and attributes.
- The search will be constrained to elements within the selected navigation tree node. To search the entire PDX file, select (click to highlight) the top ProductDataeXchangePackage node before opening the Find window.
- Enter the exact search text that you want to find; for example, ECO 001.
- You can specify whether searches are limited to the element names in the navigation tree, attribute values within the detail panels, or both.
- The number of matches will be incremented until no further matches are found. All matched elements are added to the navigation history list, and you can move backward and forward to re-visit the elements (callouts 2 and 3, above).
Data selection
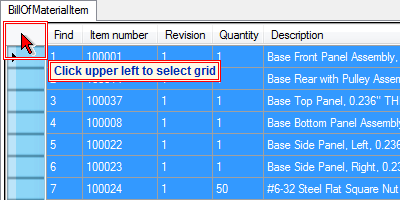
To view and copy data into other applications, such as email or Excel:
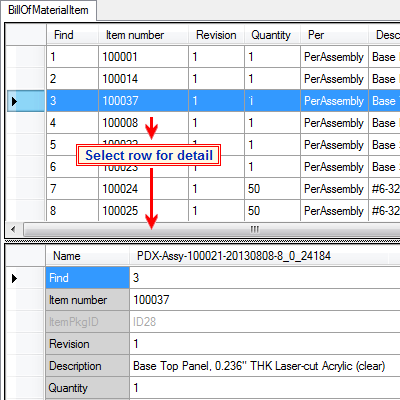
- Select the row or grid.
- Click the toolbar button (callout 5, above).
Export data as CSV file
PDXplorer release 4.1 adds the ability to export data from a selected navigation tree node.
- Select the desired tree node to export. To export data from the entire PDX file, select the ProductDataeXchangePackage root node. (Exports can't be generated from the Top-Level Items node.)
- Click the button (callout 9, above). The Save As window opens.
- Navigate to the desired folder, enter the File name: and select Save as type: from the dropdown list of export specifications.
Not all report specifications will generate useful data. For example, selecting an item without a Bill of Materials list will create an empty export file, while selecting the entire PDX package includes items that don't have a BOM. Some exports may require further filtering or editing to achieve the desired result.
Customizing PDXplorer PDX Viewer
PDXplorer uses XML files to provide alternate languages and — since PDX generators have different implementations of the IPC-2570 standard — to optimize display of PDX data.
| XML file name | Affects | Description |
|---|---|---|
| AttributeDescriptor | Language | Assigns grid detail labels to the IPC-2570 attribute names |
| ElementDisplayName | Language | Formats data for display within the navigation tree. |
| UITextLookup | Language | Contains the application's user interface text in a localized language translation. |
| CompareConditions | PDX file comparisons | Directs which attributes are used to identify & compare similar elements. |
| ElementDifferentiator | PDX file comparisons | Specifies how differences between matched elements are formatted (underline, color, etc.). |
| IgnoreAttrDiff | PDX file comparisons | Differences in these attributes (e.g., unique identifiers that IPC-2570 adds to the product data) are irrelevant and not highlighted in comparisions. |
| ExportSpecification | Data export | Defines how PDX elements and their column headers are exported to CSV files. |
Setting language or terminology
To match a specific PLM system's export labels or to substitute another language, edit the AttributeDescriptor (IPC-2570-to-human terminology map) and UITextLookup (user interface) XML files.
Always take a backup of the original XML file before making any changes to it.
The PDXplorer setup file includes several language translations (English, Deutsch, 中文, Español, Française). To use one of these files, follow the procedure below. You may need administrative permissions on your computer to perform these steps.
- Open Windows Explorer to the PDXplorer program folder %ProgramFiles%\PDXplorer Viewer\XML\ (for example, C:\Program Files\PDXplorer Viewer\XML\).
-
In this XML folder, open the Configuration.xml file using Notepad or similar plain text editor.
As an example: To change the user labels to German, find and edit the line:
from <File name="UITextLookup" value="UITextLookup-EN.xml"/> to <File name="UITextLookup" value="UITextLookup-DE.xml"/> -
Save the Configuration.xml file; this may require saving it to some other location, such as your Desktop, and then dragging it back into the XML folder.
-
You must restart PDXplorer for changes to take effect. (Some versions of Windows appear to cache the XML, and you may need to restart your computer.)
We'd very much appreciate receiving your contributions for improving these configuration files.
Adjusting comparisons
When PDXplorer compares two elements, it first looks for an "anchor" attribute that determines how the elements should be compared. For example, items in different PDX packages are usefully compared when their item numbers (IPC-2570 itemIdentifier) are the same.
By default, PDXplorer compares bills of materials using each row's find number (proprietarySequenceIdentifier). If you prefer to compare BOM by part number (billOfMaterialItemIdentifier), edit the CompareConditions.xml file.
Always take a backup of the original XML file before making any changes to it.
Change this:
<CompareConditionElement name="BillOfMaterialItem">
<CompareConditionAttribute name="proprietarySequenceIdentifier"/>
</CompareConditionElement>
to this:
<CompareConditionElement name="BillOfMaterialItem">
<CompareConditionAttribute name="billOfMaterialItemIdentifier"/>
</CompareConditionElement>
Differences in find number, such as when a part moves from one BOM row to another, remain highlighted. If you prefer to entirely disregard find numbers, then edit the IgnoreAttrDiff.xml file to add the new line:
<AttributesList element="BillOfMaterialItem">
<Attribute name="billOfMaterialItemUniqueIdentifier"/>
<Attribute name="proprietarySequenceIdentifier"/>
</AttributesList>
Some data in a PDX package are private extensions of the IPC-2570 standard. These additional attributes can sometimes be a distraction or are not easily compared between packages. You can set PDXplorer to ignore differences in additional attributes by adding a new section to the IgnoreAttrDiff.xml file:
<AttributesList element="AdditionalAttribute">
<Attribute name="value"/>
</AttributesList>
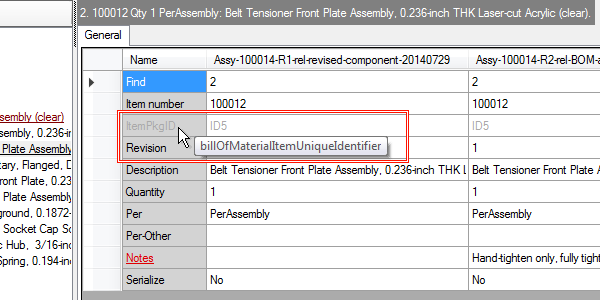
Refer to the IPC-2570 specification for attribute names, or simply hover your mouse over a grid label to get its name.
Customizing export formats
You can create, modify and remove the specifications for comma-separated value ("CSV") export files. These are contained in the ExportSpecifications.xml file — click here for example.
Always take a backup of the original XML file before making any changes to it.
In summary, a <Specification> defines an <Element> that:
-
exports a column with header label for each
- named <Attribute> within the element
- specified <Constant> (filler data)
- matched <Lookup> from a referenced element
- identifies a child <Element> that contains its own <Attribute>, <Constant> or <Lookup> values.
The detailed export format commands follow.
| Element | Attribute | Required | Type | Default | Description |
|---|---|---|---|---|---|
| Specifications | Contains all CSV export file definitions. | ||||
| Specification | The set of instructions that define a single CSV export file. | ||||
| id= | Yes | string | An arbitrary identifier, used to sort the Save dialog's Save as type: dropdown list. | ||
| name= | Yes | string | Displays the specification's name or purpose in the Save dialog's Save as type: dropdown list, such as Home Item Master (*.csv). | ||
| filename= | Yes | string | Specifies the default filename, e.g., ItemMaster-Home.csv. | ||
| Element | Identifies which PDX element is providing the information. | ||||
| name= | Yes | string1 | The PDX element name, such as Item, ManufacturerPart or AdditionalAttributes. | ||
| concatenate= | No | Boolean | "false" | Grouping PDX elements, such as ReferenceDesignators, contain individual elements (e.g., ReferenceDesignator elements). Each element within the list is concatenated when <Element name="ReferenceDesignator" concatenate="true" ... >. | |
| delimiter= | No | string | "" | When concatenate="true", specifies the character used to separate the individual elements, such as delimiter=",". | |
| attrName= | No2 | string1 | "name" | <Element name="AdditionalAttributes"
attrName="groupLabel" ... > identifies
that the PDX groupLabel contains the group
name to use for matching. <Element name="AdditionalAttribute" attrName="name" ...> is optional, since it simply confirms that attrValue contains the PDX attribute name. |
|
| attrValue= | Yes2 | string1 | Within <Element
name="AdditionalAttributes"
... >, identifies the group name (typically
the contents of a PDX groupLabel) of the
attrName. Together, the
attrName and
attrValue specify which
AdditionalAttributes grouping
contains AdditionalAttribute
data column(s) that will be selected by name within
<Attributes ... > element(s).
Within <Element name="AdditionalAttribute", identifies the attribute name that contains the data. |
||
| pivot= | Yes2 | Boolean | "false" | One or more AdditionalAttribute elements can be named and extracted from a "AdditionalAttributes" list. However, it's also possible to export every AdditionalAttribute element within the list, which is very useful if the group contains custom attributes with unknown names. In this case, <Element name="AdditionalAttribute" pivot="true" ... > exports each AdditionalAttribute as one or more data columns. | |
| Attribute | Within the containing element, specifies a PDX attribute (e.g., itemIdentifier) that has data to be exported. | ||||
| name= | Yes | string1 | Identifies the PDX attribute name. | ||
| column= | No | integer | Appends the column to the export file in the specified numeric order. | ||
| sort=4 | No | integer | Sorts the exported data rows in the specified column order; if omitted, rows are sorted by the first column's data. | ||
| datatype= | No | string | "string" | Specifies that the column is sorted as "string" (use as text) or "numeric" (convert to a number). | |
| header= | Yes | string | Defines the text used for the column's
header label in the export file. When <Element name="AdditionalAttribute" pivot="true" ... > is used to pivot an entire group of AdditionalAttributes, include header="{name}". The {name} value is automatically assigned the PDX attribute's name, and other text can be added as prefix or suffix, such as: {name}_Units |
||
| Constant | Static text applied to each row in the export file. | ||||
| value= | Yes | string | Defines data to be applied to every row in the column. If empty (value=""), then an empty column is created with the specified header value). | ||
| column= | No | integer | Appends the column to the export file in the specified numeric order. | ||
| sort=4 | No | integer | Sorts the exported data rows in the specified column order; if omitted, rows are sorted by the first column's data. | ||
| datatype= | No | string | "string" | Specifies that the column is sorted as "string" (text) or "numeric" (converted to a number). | |
| header= | Yes | string | Defines the text used for the column's header label in the export file. | ||
| Lookup3 | Searches for a referenced element ID, then assigns an attribute's value from the found element. | ||||
| name= | Yes | string1 | Identifies which PDX IDREF of the current element to use for finding the matching PDX ID element. | ||
| value= | Yes | string1 | Identifies the matched element's attribute name. | ||
| column= | No | integer | Appends the column to the export file in the specified numeric order. | ||
| sort=4 | No | integer | Sorts the exported data rows in the specified column order; if omitted, rows are sorted by the first column's data. | ||
| datatype= | No | string | "string" | Specifies that the column is sorted as "string" (text) or "numeric" (converted to a number). | |
| header= | Yes | string | Defines the text used for the column's header label in the export file. |
Notes
- String is case-sensitive, and must exactly match a PDX element or attribute name. AdditionalAttribute names are, by definition, unique to the PDX generator. Some PDX package generators don't follow IPC-2570 attribute capitalization exactly.
- Within <Element name="AdditionalAttribute" ... >, the attrName & attrValue pair are mutually exclusive to pivot="true" When specifying that the entire group will pivot (pivot="true"), do not identify individual attributes using attrName= or attrValue=.
- Using the IDREF attribute to find data in the related ID element is one level of indirection. However, it's not possible to extract all relevant information using <Lookup/>, because a PDX package can have multiple levels of indirection (e.g., BillOfMaterialItem > Item > Contact:businessName).
- The order in which rows appear when the PDX data value is empty is undefined.
A PDX package contains only single-level assemblies, as defined within each Item element's BillOfMaterial list. Therefore, a multi-level indented bill of materials can't be exported directly. The IPC-2570 authors assumed this is acceptable because downstream computer systems, such as ERP/MRP, typically import only single-level BOMs.
PDX file problems & solutions
Very large PDX files
It's possible that a PDX file includes many large file attachments that cannot be decompressed within the current computer's memory or disk resources. In this case, you can manually extract the product data (and file attachments), and then recreate a smaller PDX file.
-
Save the PDX file to a convenient location, such as your computer Desktop or My Documents folder. Let's say you're working with the example.pdx file, and you save it to your Desktop.
- Open Windows Explorer, and change the file extension to .zip, in our case from example.pdx to example.zip. We will be extracting files from this archive.
-
Open the example.zip archive file:
- If you're using a recent Windows system, such as Windows 7, open the file as a compressed folder with Windows Explorer.
- If you're using an older system, such as Windows XP, then use a third-party tool such as WinZip.
-
Within the example.zip archive file, find the pdx.xml file and copy it to a location on your computer, such as your Desktop. If you wish, you can also extract all of the file attachments from the archive file.
-
Create a new compressed archive file that contains only the pdx.xml file:
- If you're using a recent Windows system, within Windows Explorer, right-click on the pdx.xml file and select , for instance pdx-only.zip.
- If you're using an older system, such as Windows XP, then use a third-party tool to add the pdx.xml file to a new pdx-only.zip archive file.
- Change the new archive file's extension to .pdx (like pdx-only.pdx).
The new PDX package now should be small enough to open with PDXplorer. This allows you to examine the items, BOM and other data. However, it doesn't contain the file attachments of the original PDX file, so none of the attachment links will work.
Adobe Reader PDX file icon
Adobe Reader's secondary Catalog Index files use the same .pdx file extension as PDXplorer, although the files have different purposes. All PDX files will be associated with whichever application was last updated. Since most users never open Adobe Catalog Index files, it's usually more convenient for Windows Explorer to display PDXplorer's "package" icon, and to launch PDXplorer on double-clicking.
After an Adobe Reader update, you can refresh the PDXplorer package icon using Windows Control Panel: open Programs and Features, scroll down and select PDXplorer Viewer, and then click the or button. This won't affect the Adobe Reader .pdf file icon, or normal Adobe functions.